
I remember the first time I tried making Beef Wellington. What a hot mess! The puff pastry was soggy, the duxelles were watery, and honestly, the whole thing looked like a culinary disaster. I almost gave up right then and there.
But I’m stubborn, and I knew there had to be a way to make this classic recipe work for my family. So, I started tweaking things, focusing on simple swaps and time-saving strategies.
I quickly learned that proper searing of the beef tenderloin is critical for retaining moisture and flavor. Also, thoroughly drying the duxelles is a game changer! I also started using pre-made puff pastry (because, hello, busy mom life!).
The biggest surprise? My kids loved it! They thought I was the fanciest chef in the world. More importantly, I realized that Beef Wellington could be a great way to get some extra nutrients into their bellies, especially when paired with wholesome sides. This Beef Wellington recipe also supports my goal to provide nourishing meals that bring joy to my family.
That’s why I’m so excited to share my sanity-saving version with you. I know how hard it is to juggle everything and still put healthy meals on the table. So, if you’re a fellow busy mom seeking simple nutrition, stick with me. I think you’ll find my version approachable and delicious. Let’s get cooking!
INGREDIENTS You’ll Need:
Okay, fellow nutrition-seekers, let’s gather our ingredients. Don’t worry, this Beef Wellington ingredient list is simple because busy moms need nutrition without complexity! Here’s what you’ll need to make this dinnertime nutrition win happen:

- 1 (2-3 pound) Beef Tenderloin Roast: This is your protein powerhouse!
- 1 tablespoon Olive Oil: For searing that beautiful beef.
- 8 ounces Cremini Mushrooms, finely chopped: These become our nutritious duxelles!
- 2 cloves Garlic, minced: Flavor and immune-boosting properties!
- 2 tablespoons Fresh Thyme Leaves: Adds a touch of earthy goodness.
- 1/4 cup Dry Sherry (optional): Adds depth of flavor.
- 4 ounces Prosciutto, thinly sliced: Adds a salty, savory layer.
- 1 package (14.1 ounces) Puff Pastry Sheets, thawed: Sanity-saving shortcut!
- 1 Large Egg, beaten: For that golden-brown, gorgeous crust.
- Salt and Black Pepper to taste: Seasoning is key!
Nutrition-focused ingredient swaps: No worries if you don’t have sherry – I often skip it or use a splash of balsamic vinegar for extra zing in my Beef Wellington. Also, feel free to experiment with different herbs in your duxelles! Rosemary or oregano would be delicious.
Real-life shopping tips: You can find these wholesome ingredients at your regular grocery store, I promise! And look for puff pastry on sale – it freezes well, so stock up! This Beef Wellington proves nutritious doesn’t mean expensive, it’s all about smart shopping.
Ingredient prep shortcuts for busy families: Buy pre-sliced mushrooms to save time! Or, even better, use a food processor to chop them quickly. You can also mince the garlic ahead of time and store it in the fridge. And, I always buy pre-made puff pastry!
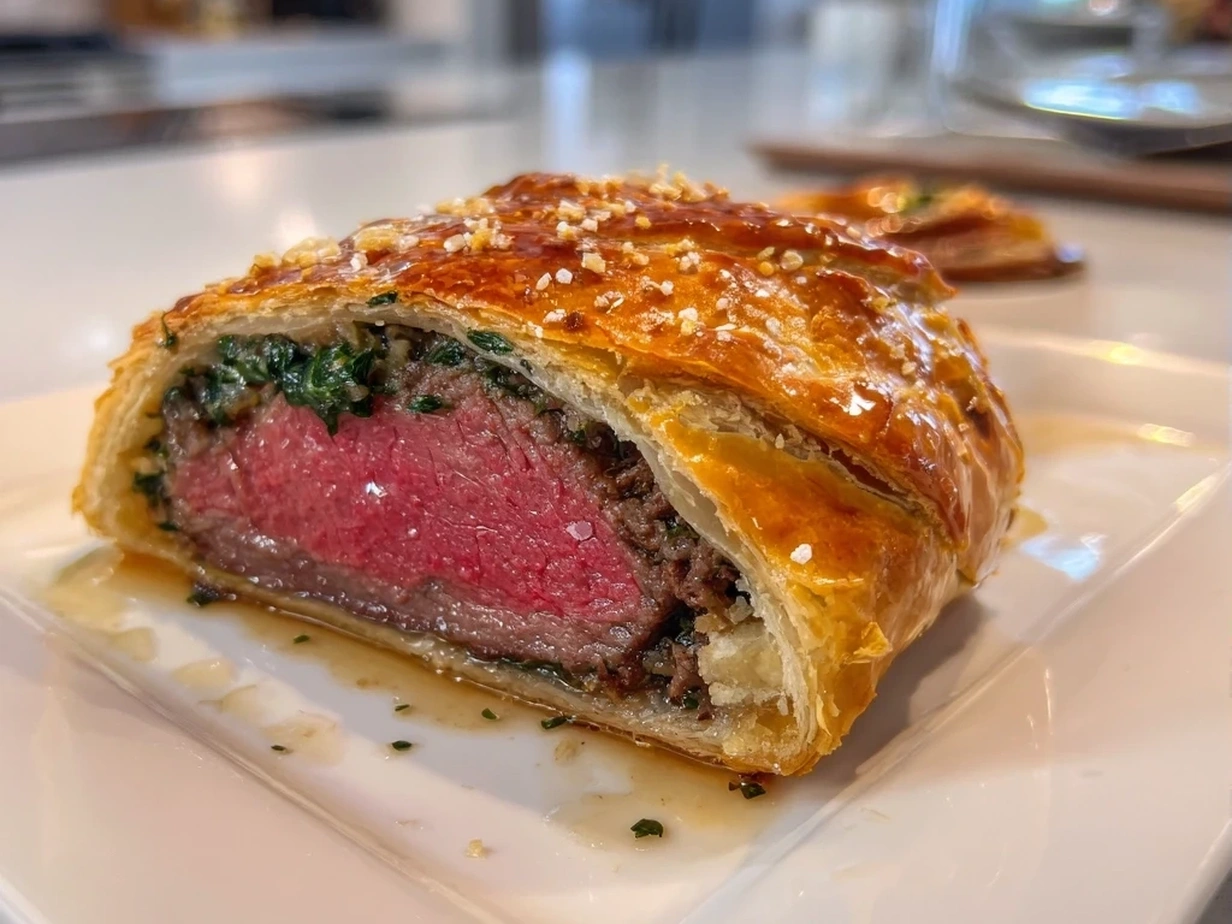
My family gets extra nutrition when I add a thin layer of spinach leaves between the prosciutto and the puff pastry. It’s a sneaky way to add some greens! You can also add some finely chopped kale to the duxelles for an extra boost. Trust me, no one will even notice! It’s a Beef Wellington nutrition hack that changed our family’s health.
Let’s Make it Happen!
Alright, fellow moms, let’s get our aprons on and make this Beef Wellington magic happen! Don’t be intimidated – I’m here to guide you every step of the way.
- Sear the Beef: Pat the beef tenderloin dry with paper towels and season generously with salt and pepper. Heat the olive oil in a large oven-safe skillet over high heat. Sear the beef on all sides until browned, about 2-3 minutes per side. Transfer the skillet to a 400°F oven and roast for 12-15 minutes, or until a meat thermometer inserted into the thickest part registers 125-130°F for medium-rare. Remove from the oven and let cool completely. This initial searing is so important!
- Make the Duxelles: While the beef is cooling, prepare the duxelles. Heat a large skillet over medium heat. Add the chopped mushrooms and cook, stirring occasionally, until they release their liquid and the liquid evaporates, about 8-10 minutes. Add the minced garlic and thyme and cook for another minute until fragrant. If using, stir in the sherry and cook until absorbed. Season with salt and pepper to taste. Remove from heat and let cool completely. Make sure the duxelles is completely dry.
- Assemble the Wellington: On a clean work surface, lay out a large sheet of plastic wrap. Arrange the prosciutto slices in a slightly overlapping layer on the plastic wrap, creating a rectangle large enough to wrap around the beef tenderloin. Spread the cooled duxelles evenly over the prosciutto. Place the cooled beef tenderloin on top of the duxelles. Use the plastic wrap to tightly wrap the prosciutto and duxelles around the beef, forming a log. Twist the ends of the plastic wrap to secure and refrigerate for at least 30 minutes. This step is crucial for a neat Beef Wellington.
- Wrap in Puff Pastry: On a lightly floured surface, unfold the thawed puff pastry sheet. If necessary, roll it out slightly to create a rectangle large enough to wrap around the beef. Remove the beef from the refrigerator and unwrap it from the plastic wrap. Place the beef in the center of the puff pastry. Brush the edges of the puff pastry with the beaten egg. Fold the puff pastry over the beef, sealing the edges tightly. Trim any excess puff pastry.
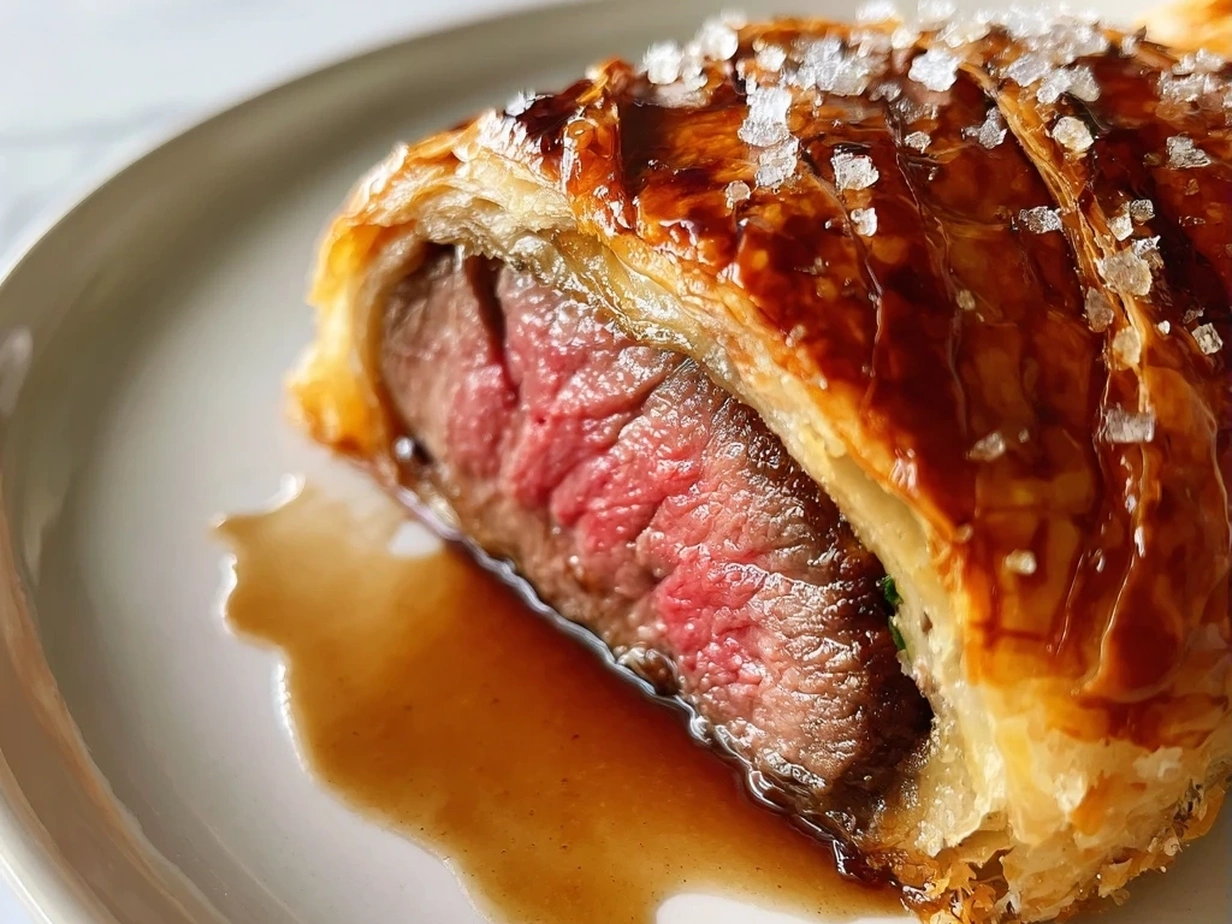
- Decorate and Bake: Place the Beef Wellington seam-side down on a baking sheet lined with parchment paper. Brush the entire surface with the remaining beaten egg. If desired, score the top of the puff pastry with a sharp knife to create a decorative pattern. I sometimes use cookie cutters to make fun shapes for the kids! Bake in a preheated oven at 400°F for 30-35 minutes, or until the puff pastry is golden brown and the internal temperature of the beef reaches 135-140°F for medium.
- Rest and Serve: Remove the Beef Wellington from the oven and let it rest for at least 10 minutes before slicing and serving. This allows the juices to redistribute, resulting in a more tender and flavorful dish. Slice into 1-inch thick slices and serve immediately.
In my busy kitchen, this nutritious Beef Wellington usually takes about an hour and a half from start to finish. Perfect time to prep tomorrow’s lunch while it bakes!
Your Beef Wellington should smell nourishing by now. Don’t worry if your Beef Wellington looks a little imperfect – mine usually does! It’s all part of the charm of homemade cooking.
Here’s where I used to struggle with my Beef Wellington – the puff pastry would sometimes be soggy on the bottom. The solution? Make sure your baking sheet is hot when you put the Beef Wellington in the oven. And don’t overcook it!
While your Beef Wellington is cooking, take a moment to appreciate nourishing your family! It’s a gift to be able to provide them with healthy, delicious food.
How We Love to Eat This!
Okay, now for the fun part – serving this delicious Beef Wellington! This Beef Wellington makes a dinner party that no one will ever forget!
The kids devour this nutritious Beef Wellington when I serve it with roasted broccoli and mashed sweet potatoes. The sweetness of the potatoes balances the richness of the beef perfectly. I also love to add a simple green salad with a light vinaigrette.
This Beef Wellington is perfect for those busy weeknights when we need good nutrition fast! Okay, maybe not fast, but it’s definitely worth the effort! It’s also a great dish for special occasions or holidays. My family loves it for Christmas dinner!
Presentation is key when it comes to getting kids to eat healthy food. I like to arrange the Beef Wellington slices on a platter with the colorful side dishes, making it look like a work of art. A sprig of fresh rosemary or thyme adds a touch of elegance.
Leftover Beef Wellington? No problem! Slice it thinly and use it in sandwiches or salads the next day. You can also chop it up and add it to omelets or frittatas. Just make sure to store it properly in the refrigerator to maintain its freshness.
I’ve tried a few seasonal variations of this Beef Wellington. In the fall, I add roasted butternut squash to the duxelles. In the spring, I use asparagus instead of broccoli as a side dish.
My husband loves this classic version, while my kids prefer it with a little bit of cheese melted on top. Everyone is always happy when Beef Wellington is on the menu. Even my pickiest eater loves it!
My friend said this was the best Beef Wellington she had ever had, and she has eaten it at fancy restaurants!
FAQs: Your Questions Answered
I know you probably have some questions about making Beef Wellington. Here are some of the most common ones I get from fellow busy moms:
Is this Beef Wellington really nutritious enough for growing kids?
Absolutely! Beef Wellington is packed with protein, iron, and other essential nutrients. Plus, you can easily add extra veggies to the duxelles or serve it with wholesome side dishes. It is better to have an adult-size portion rather than a child-size one.
What if my picky eater won’t try this healthy Beef Wellington?
Don’t give up! Start by offering them a small piece and let them see you enjoying it. You can also try adding a little bit of their favorite sauce or condiment. And remember, it can take multiple exposures for a child to accept a new food. The Beef Wellington could be a fun thing they try.
Can I meal prep this Beef Wellington for busy weeks ahead?
Yes, you can definitely prep parts of this Beef Wellington ahead of time. You can make the duxelles and wrap the beef in prosciutto up to 24 hours in advance. Just store it in the refrigerator until you’re ready to assemble the Wellington.
Can I freeze Beef Wellington?
Yes, you can! Assemble the Beef Wellington up to the point of baking, then wrap it tightly in plastic wrap and foil. Freeze for up to 3 months. When ready to bake, thaw overnight in the refrigerator and bake as directed.
How can I make Beef Wellington gluten-free?
Use gluten-free puff pastry. It may not be quite the same as traditional puff pastry, but it will still be delicious! This is a nutritious Beef Wellington alternative!
What is the best cut of beef to use for Beef Wellington?
Beef tenderloin is the classic choice because it’s incredibly tender and flavorful. But you can also use a sirloin roast if you’re on a budget.
How do I prevent the puff pastry from getting soggy?
Make sure the duxelles is completely dry before wrapping the beef. Also, don’t overcook the Wellington, or the pastry will get soggy.
Fellow moms have said the biggest struggle in this is to keep the puff pastry from getting soggy on the bottom. So a hack to fix this is to place the Beef Wellington on a hot baking sheet!
Final Thoughts:
So there you have it – my sanity-saving version of Beef Wellington! I hope I’ve shown you that this classic recipe can be totally doable for busy families. It’s all about simple swaps, time-saving strategies, and a little bit of confidence in the kitchen.
This Beef Wellington supports my family’s nutrition goals by providing a protein-packed meal that’s also packed with flavor. Plus, it’s a great way to get some extra veggies into their bellies.
My Beef Wellington Nutrition Hacks:
- Sneak in extra veggies: Add finely chopped spinach or kale to the duxelles for a boost of nutrients.
- Use pre-made puff pastry: It’s a sanity-saving shortcut that doesn’t sacrifice flavor.
- Serve with wholesome side dishes: Roasted vegetables, mashed sweet potatoes, or a simple green salad are all great choices.
Here are a few family-tested healthy Beef Wellington variations:
- Cheese Lover’s Wellington: Add a layer of melted cheese on top of the beef before wrapping it in puff pastry. My kids love this version!
- Spicy Wellington: Add a pinch of red pepper flakes to the duxelles for a little bit of heat.
- Mushroom Hater’s Wellington: Skip the duxelles altogether and just wrap the beef in prosciutto and puff pastry.
My husband prefers the classic version, while my kids love the cheese lover’s version. No matter which version you choose, I hope you and your family enjoy this delicious and nutritious meal!
Remember, there is a lot of pressure, but don’t put too much pressure on yourself.
I hope you feel inspired to make this nutritious Beef Wellington! If you are still needing inspiration check out To me, Beef Wellington is king of Filet steaks. But as we all know …
Remember to make it your own, experiment with different flavors and ingredients, and most importantly, have fun! I have faith that you can do it! If you want a little twist check out Introducing the Meatloaf Wellington?! I teamed up with …
For the busy family, I hope it is simple to make this How to Make Beef Wellington – Grill Momma.
I’m cheering you on from my kitchen to yours! Remember, good nutrition doesn’t have to be complicated. You got this! And if your family loves this wholesome recipe, they’ll go crazy for this Korean BBQ Beef Bowl Recipe.
\n \n Print
Beef Wellington

Beef Wellington is an impressive and elegant dish featuring a tender beef tenderloin coated in duxelles and pâté, wrapped in puff pastry, and baked to golden perfection. This show-stopping main course is perfect for special occasions and holiday gatherings.
- Prep Time: 30 minutes
- Cook Time: 40 minutes
- Total Time: 70 minutes
- Yield: 6-8 servings
- Category: Dinner
- Method: Baked
- Cuisine: British
Ingredients
- 1 (2-3 pound) beef tenderloin roast, trimmed
- 2 tablespoons olive oil
- Salt and freshly ground black pepper, to taste
- 1 pound cremini mushrooms, finely chopped
- 2 shallots, finely chopped
- 2 cloves garlic, minced
- 2 tablespoons fresh thyme leaves
- 1/4 cup dry sherry or Madeira wine
- 1/2 cup pâté (such as duck or chicken liver pâté)
- 1 (17.3-ounce) package frozen puff pastry, thawed
- 2 large eggs, beaten
Instructions
- Preheat oven to 425°F (220°C). Season the beef tenderloin with salt and pepper. Heat olive oil in a large oven-safe skillet over medium-high heat. Sear the beef on all sides until browned, about 2-3 minutes per side. Remove from skillet and let cool slightly.
- While the beef is cooling, prepare the duxelles: In the same skillet, sauté the mushrooms, shallots, and garlic over medium heat until the mushrooms release their liquid and it evaporates, about 8-10 minutes. Stir in the thyme and sherry (or Madeira wine) and cook for another 2 minutes. Season with salt and pepper to taste. Let cool completely.
- Spread the pâté evenly over the cooled beef tenderloin. Then, spread the cooled duxelles mixture evenly over the pâté.
- On a lightly floured surface, roll out the puff pastry to a 1/4-inch thickness. Wrap the pastry around the beef tenderloin, sealing the edges with a little bit of beaten egg. Trim any excess pastry.
- Place the Beef Wellington on a baking sheet lined with parchment paper. Brush the entire surface with the remaining beaten egg. Cut a few slits in the top of the pastry to allow steam to escape.
- Bake for 30-40 minutes, or until the pastry is golden brown and the internal temperature of the beef reaches 130-135°F (54-57°C) for medium-rare.
- Let rest for 10 minutes before slicing and serving.
Notes
Serve with a red wine reduction sauce or a side of roasted vegetables for a complete meal.