
Hey fellow nutrition-seekers! Let’s talk about a dessert that’s not only delicious but also a potential dinnertime nutrition win: Creme Brulee Pie. Yep, you heard me right! We’re taking the classic creme brulee and turning it into a pie that’s surprisingly family-friendly.
This recipe is a game-changer in my house. It’s got that “wow” factor, but it doesn’t take hours in the kitchen. As busy moms, we need simple, and this Creme Brulee Pie delivers.
I’m excited to share my version of this creamy dream with you, perfected through many attempts. It’s easier than you think and a total crowd-pleaser. Come along as we explore how this Creme Brulee Pie can fit into our busy lives without sacrificing taste or nutrition. This creme brulee tart is the perfect option.
I still remember the first time I tried making this Creme Brulee Pie. My youngest was going through a picky eating phase, and I was desperate for a dessert that wasn’t loaded with processed sugars. That’s when I stumbled upon the idea of a Creme Brulee Pie, and I thought, “Why not try to make it healthier?”
It was a bit of a disaster at first – the custard was too runny, the crust was soggy. But I kept tweaking it, swapping ingredients, and experimenting until I landed on a version that my whole family loved. What really surprised me was how much my picky eater enjoyed the creamy texture and the caramelized sugar crust. Who knew brulee custard pie could be so easy?
Now, Creme Brulee Pie has become a regular treat in our house, and I love that I can feel good about serving it. It feels fancy, but it’s actually a really simple way to get some extra protein and dairy into our diets.
If you’re looking for sanity-saving nutrition without complicated steps, you’re in the right place! Let’s get baking and bring some joy to our families!
INGREDIENTS You’ll Need:
Here’s what you’ll need to create this delightful Creme Brulee Pie:
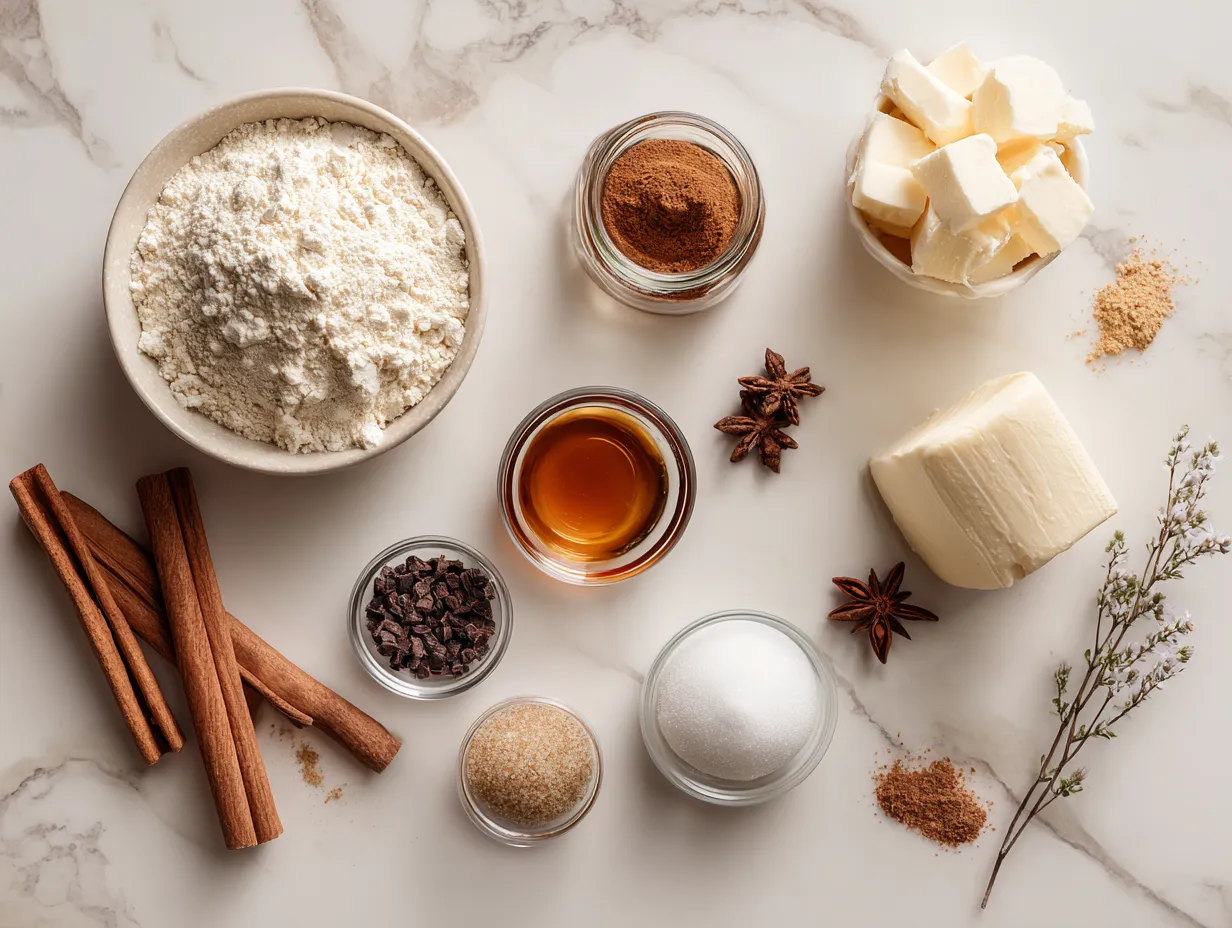
- 1 1/2 cups heavy cream: This is the base of our creamy custard. If you’re looking to lighten it up, you can substitute some of the heavy cream with half-and-half, but keep in mind that it will affect the richness and texture. Trust me, this easy creme brulee pie is worth it.
- 1/2 cup whole milk: Adds extra creaminess. I sometimes use unsweetened almond milk for a lighter option, but whole milk gives the best flavor.
- 5 large egg yolks: These are what give the custard its thick, luxurious texture. Make sure to save the egg whites for an omelet or meringue!
- 1/2 cup granulated sugar: Sweetens the custard perfectly. I sometimes reduce the amount slightly and add a touch of honey for extra flavor.
- 1 teaspoon vanilla extract: Enhances the flavor of the custard. Use good quality vanilla extract for the best results.
- 1/4 teaspoon salt: Balances the sweetness and brings out the flavors.
- 1 pre-made pie crust: To save time, I use a store-bought pie crust. But if you’re feeling ambitious, you can definitely make your own!
- 1/4 cup granulated sugar (for the topping): This is what we’ll use to create that signature caramelized crust.
- Optional: Fresh berries for garnish: Adds a pop of color and freshness.
This Creme Brulee Pie proves nutritious doesn’t mean expensive. You can find these wholesome ingredients at your regular grocery store. You can find many of these ingredients when you shop online!
Trust me, this Creme Brulee Pie ingredient list is simple because busy moms need nutrition without complexity! Here’s a Creme Brulee Pie nutrition hack that changed our family’s health: I add a tablespoon of flaxseed meal to the custard base for extra fiber and Omega-3s. My family gets extra nutrition when I add this into the pie. No one even notices!
Let’s Make it Happen!
Alright, fellow moms, let’s dive into making this Creme Brulee Pie. Don’t worry, I’ve broken it down into easy-to-follow steps so we can get this done efficiently.
- Preheat and Prep: Preheat your oven to 325°F (160°C). Place your pre-made pie crust in a pie dish. This easy creme brulee pie can be assembled in minutes.
- Whisk the Custard: In a medium bowl, whisk together the heavy cream, whole milk, egg yolks, sugar, vanilla extract, and salt until well combined. It should be smooth and creamy.
- Pour into Crust: Gently pour the custard mixture into the pie crust. Be careful not to overfill it! Your Creme Brulee Pie should smell nourishing by now.
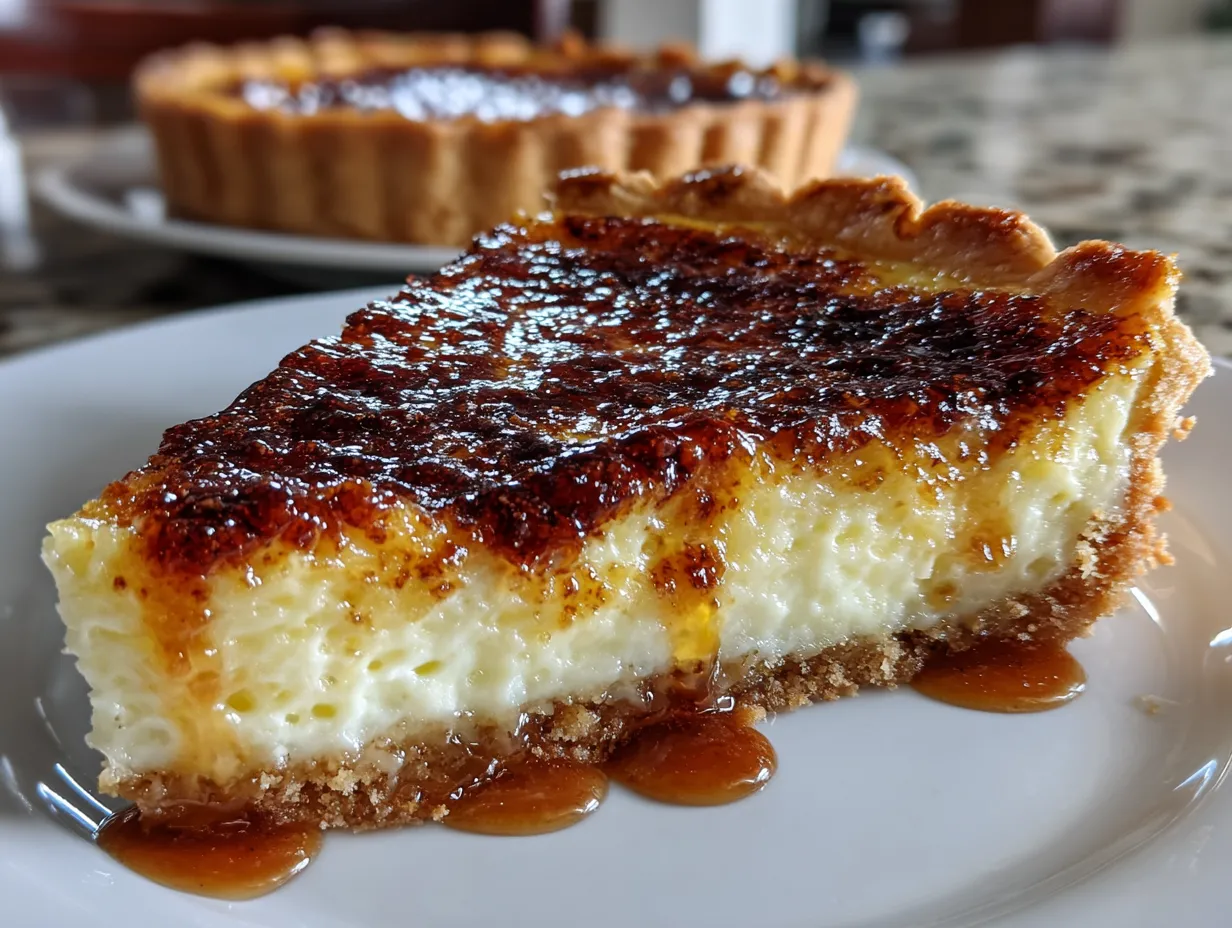
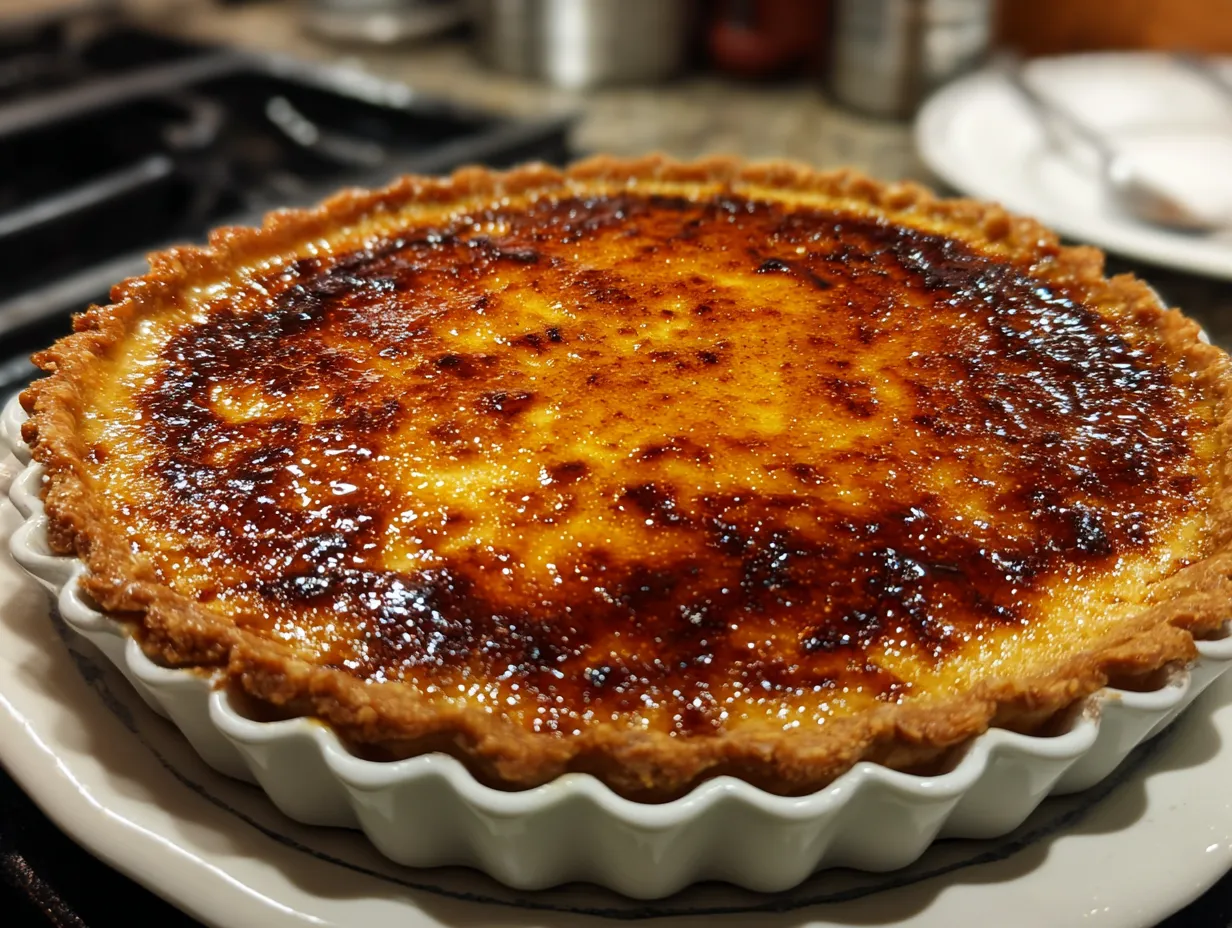
- Bake: Place the pie dish on a baking sheet and bake for 45-55 minutes, or until the custard is set around the edges but still slightly jiggly in the center. It should look like a caramelized custard pie when you’re done.
- Cool Completely: Remove the pie from the oven and let it cool completely at room temperature. This is important because it allows the custard to set properly. Don’t worry if your Creme Brulee Pie looks a little wobbly at first – it will firm up as it cools.
- Chill: Once cooled, cover the pie with plastic wrap and refrigerate for at least 4 hours, or preferably overnight. This step is crucial for achieving that perfect creamy texture.
- Prepare for Brulee: Just before serving, sprinkle the remaining 1/4 cup of granulated sugar evenly over the top of the pie. You can use a kitchen torch to caramelize the sugar, or you can place the pie under the broiler for a few minutes until the sugar is melted and bubbly. Watch it closely to prevent burning!
- Brulee the Top: If using a kitchen torch, hold the flame a few inches above the sugar and move it back and forth until the sugar is melted and caramelized. If using the broiler, place the pie on the top rack and broil for 2-3 minutes, watching carefully until the sugar is melted and bubbly.
- Serve Immediately: Let the caramelized sugar cool for a minute or two before slicing and serving. This Creme Brulee Pie is best enjoyed fresh!
In my busy kitchen, this nutritious Creme Brulee Pie usually takes about an hour and a half from start to finish, including baking and cooling time. While your Creme Brulee Pie is cooking, take a moment to appreciate nourishing your family! That’s the perfect time to prep tomorrow’s lunch! Here’s where I used to struggle with my Creme Brulee Pie – I would always try to rush the cooling process, which resulted in a runny custard. Learn from my experience and be patient!
How We Love to Eat This!
This Creme Brulee Pie is a huge hit with my family, and we’ve found some fun ways to enjoy it. We love pairing it with fresh berries like raspberries or strawberries for a burst of freshness and added nutrients. The kids devour this nutritious Creme Brulee Pie when I serve it with a dollop of whipped cream and a sprinkle of cinnamon.
It’s also perfect for special occasions like birthdays or holidays. It feels fancy, but it’s so easy to make! For a seasonal twist, I sometimes add a pinch of nutmeg and cinnamon to the custard during the fall and winter months.
This Creme Brulee Pie is perfect for those busy weeknights when we need good nutrition fast! If you have any leftover pie (which is rare in my house!), you can store it in the refrigerator for up to 3 days. The caramelized sugar topping might soften over time, but it will still taste delicious.
For presentation, I like to dust the pie with powdered sugar and arrange fresh berries around the edges. It makes it look extra special! Plus, presentation is key when it comes to getting kids to try new things. This Creme Brulee Pie reminds me of another family-healthy favorite, Marry Me Chicken Soup because it’s also comforting and satisfying.
My family gets extra nutrition when I serve this Creme Brulee Pie with a side of fruit salad. It’s a great way to balance out the richness of the pie and add some extra vitamins and minerals to our meal. Guests are always impressed by this healthy and delicious dessert.
FAQs: Your Questions Answered
Here are some common questions I get about making Creme Brulee Pie, answered with a busy mom’s perspective:
1. Is this Creme Brulee Pie really nutritious enough for growing kids?
Absolutely! While it’s still a dessert, this Creme Brulee Pie provides protein from the eggs and calcium from the dairy. Plus, you can add healthy twists like flaxseed meal for extra fiber and Omega-3s.
2. What if my picky eater won’t try this healthy Creme Brulee Pie?
Presentation is key! Try serving it with their favorite fruit or a small scoop of ice cream. You can also let them help you sprinkle the sugar on top before bruleeing it – getting them involved in the process might make them more willing to try it. For more simple nutrition ideas for busy families, check out Loaded Hamburger Soup.
3. Can I meal prep this Creme Brulee Pie for busy weeks ahead?
Yes, you can definitely make the custard filling ahead of time and store it in the refrigerator for up to 2 days. Just pour it into the pie crust and bake it when you’re ready to serve. However, I recommend bruleeing the sugar topping right before serving for the best texture.
4. Can I use a different type of crust?
Of course! If you’re gluten-free, you can use a gluten-free pie crust. You can also use a graham cracker crust or even a chocolate crust for a different flavor profile.
5. What if I don’t have a kitchen torch?
No problem! You can use the broiler to caramelize the sugar topping. Just make sure to watch it closely to prevent burning. It’s also important to ensure the pie is properly chilled.
6. Can I reduce the amount of sugar in this Creme Brulee Pie?
Yes, you can reduce the amount of sugar in the custard filling. However, keep in mind that it will affect the sweetness and texture of the pie. I recommend starting with a small reduction and adjusting to taste. If your kids love this wholesome recipe, they’ll go crazy for Calico Bean Casserole Recipe.
7. How do I prevent the crust from getting soggy?
To prevent the crust from getting soggy, you can blind bake it before adding the custard filling. This involves pre-baking the crust for about 10-15 minutes before adding the filling. You can also brush the bottom of the crust with melted chocolate to create a barrier between the crust and the filling. This brulee custard pie has a great flavor to it.
Final Thoughts:
This Creme Brulee Pie has become a dinnertime nutrition win in our house, and I hope it does the same for you!
My Creme Brulee Pie Nutrition Hacks:
- Add Flaxseed Meal: Sneak in a tablespoon of flaxseed meal for extra fiber and Omega-3s.
- Use Whole Milk: Opt for whole milk for added creaminess and nutrients, but feel free to experiment with alternatives like almond milk. You can check Crème Brûlée Pie – Pies and Tacos, to compare this method with others.
- Serve with Berries: Pair with fresh berries for a burst of vitamins and antioxidants. A Caramel Creme Brulee Pie – Belly Full with a side of berries is perfect!
Here are some family-tested healthy Creme Brulee Pie variations:
- Chocolate Creme Brulee Pie: Add melted chocolate to the custard filling for a decadent twist. My oldest loves this version!
- Pumpkin Spice Creme Brulee Pie: Add pumpkin puree and pumpkin pie spice to the custard filling for a fall-inspired treat. This is my personal favorite!
- Coconut Creme Brulee Pie: Add coconut milk and shredded coconut to the custard filling for a tropical flavor. The little one enjoys this pie.
Remember, fellow nutrition-seekers, the goal is simple nutrition, not perfection. Don’t be afraid to experiment with different ingredients and variations to find what works best for your family. Some people compare it to the flavor of a Crème Brûlée Pie. I hope this Creme Brulee Pie brings joy and nourishment to your table.
Happy baking, and here’s to many more dinnertime nutrition wins! Now go and enjoy this creme brulee tart!
Creme Brulee Pie
This Creme Brulee Pie takes the classic custard dessert and transforms it into an easy-to-slice and serve pie. A buttery graham cracker crust holds a rich, creamy custard base topped with a perfectly crackly caramelized sugar crust.
- Prep Time: 30 minutes
- Cook Time: 60 minutes
- Total Time: 90 minutes
- Yield: 8 servings
- Category: Dessert
- Method: Baked
- Cuisine: American
Ingredients
- For the Crust:
- 1 1/2 cups graham cracker crumbs
- 1/4 cup granulated sugar
- 6 tablespoons (3 ounces) unsalted butter, melted
- For the Custard:
- 4 cups heavy cream
- 1 vanilla bean, split lengthwise and seeds scraped
- 1 cup granulated sugar
- 8 large egg yolks
- 1/4 teaspoon salt
- For the Topping:
- 1/2 cup granulated sugar, for bruleeing
Instructions
- Make the Crust: Preheat oven to 350°F (175°C). In a medium bowl, combine graham cracker crumbs, sugar, and melted butter. Press firmly into the bottom and up the sides of a 9-inch pie plate.
- Bake for 8-10 minutes, or until lightly golden. Let cool completely.
- Make the Custard: Reduce oven temperature to 300°F (150°C). In a medium saucepan, combine heavy cream, vanilla bean and seeds, and sugar. Heat over medium heat, stirring occasionally, until sugar is dissolved and mixture is simmering. Remove from heat and let steep for 30 minutes.
- In a large bowl, whisk together egg yolks and salt until pale yellow. Slowly pour the warm cream mixture into the egg yolks, whisking constantly to prevent curdling. Strain the custard through a fine-mesh sieve into a clean bowl.
- Pour the custard into the prepared crust. Bake for 50-60 minutes, or until the custard is set around the edges but still slightly wobbly in the center.
- Let cool completely at room temperature, then chill in the refrigerator for at least 4 hours, or preferably overnight.
- Brulee the Topping: Just before serving, sprinkle the top of the chilled pie evenly with granulated sugar. Use a kitchen torch to caramelize the sugar, moving the flame back and forth to create an even, golden-brown crust. Alternatively, you can broil the pie for 1-2 minutes, watching very carefully to prevent burning.
- Let the caramelized sugar crust cool and harden for a few minutes before serving.
Notes
For an extra touch, garnish with fresh berries before serving. If you don’t have a kitchen torch, the broiler method works, but requires very close attention to avoid burning.